Monday 30 July 2018

Top 5 Best Free Backup Tools For Mac 2019

Top 5 Best Free Backup Tools For Mac
Best Free Backup Tools For Mac
1.Time Machine


Lets start the list with Time Machine, the macOS very own backup program. I have been using Time Machine since a couple of years and the feature has served me well. All you need to do is plug in a portable hard disk and configure the time machine to backup your data periodically. That being said Time Machine lacks advanced options and offers a very basic user interface. If you are a home user and are looking out for a basic backup tool the Time Machine should serve you well, else read on.
2.FreeFileSync


FreeFileSync fills in the void and offers all the advanced features that the time Machine misses out on. The file explorer interface can be used to sync contents accross two sources. The best part is that the FreeFileSync offers a good degree of control to the users when it comes to the specific files/folders that ought to be synced. With the two-way syncronisation you can make sure that both the folders are up to date and also handle the conflicts/duplication of files.


Download Freefilesync here
3.Super Duper


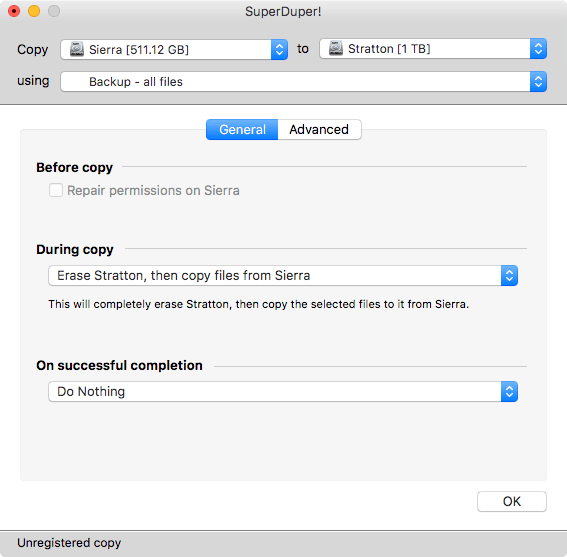
We have all heard of disk-cloning applications. Disk cloning is often referred to the process wherein your startup disk is backed up. In other words with this feature you can backup your entire operating system along with the user settings. The free tier of the Super Duper lets you backup and restore full disks but doesn’t allow users to schedule the process. If you want to have those advanced features you need to chip in and go for the premium tier.


Download SuperDuper here
4.CrashPlan


Untill now we have mostly talked about local file backup. However, it is also preferred to backup data on cloud drives. CrashPlan offers you free local cloud storage and allows yout backup Mac computers by creating your own local cloud. If you are wary of trusting cloud servers you can also backup your computer on off-site locations like your office servers. The free version of CrashPlan is pretty comprehensive and offers the ability to schedule backups, create off side backups and backup external drives.


Download CrashPlan here
5.iBackup


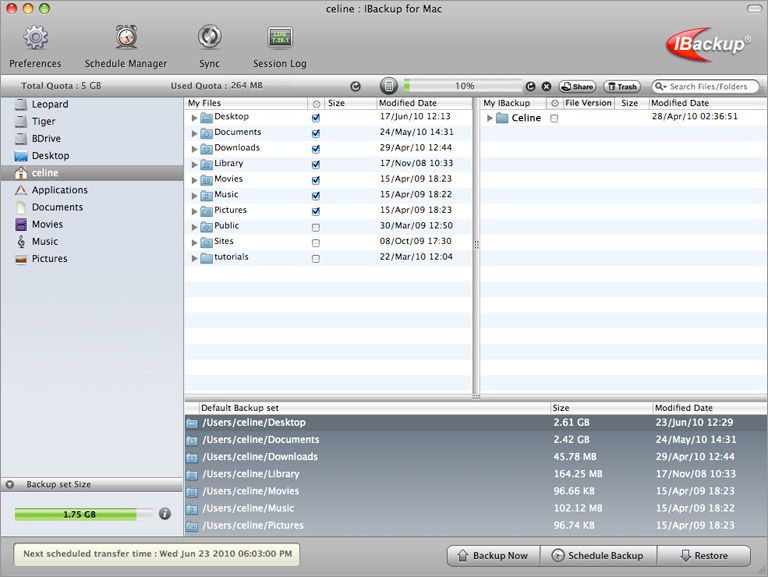
iBackup relies on a user interface that mostly resembles the macOS file explorer. The program allows you to select and backup single files/folders from your home directory. Additionally iBackup also allows you to backup system preferences and settings. Most importantly the iBackup is very efficient when it comes to backing up your Mac.


Download iBackup here
Conclusion


The world of free backup is less populated than it once was. However, two core applications, Time Machine and SuperDuper, can work together to create an excellent backup system that will protect you from many kinds of data loss. Just add a cloud backup service like Backblaze or Carbonite. Then you’ll have a robust backup system to keep your Mac’s files safe.


iPhone backup extractor :The best iPhone Backup Extractor software to extract photos, text messages, contacts, voice memos, note, WhatsApp, Viber and etc from iPhone/iPad backup


Gihosoft Free iPhone Data Recovery is a professional iPhone Data Recovery software to get back all your lost text message, photo, video, call history, note, contact and more from iPhone/iPad/iPod Touch. It offers a full solution to recover your lost data in different tough situations. Besides recovering data directly from iPhone, iPad and iPod touch, it also allows you to recover data from iCloud and iTunes backup files.Sponsor ads:
Gihosoft iPhone Data Recovery Free
Free iPhone Data Recovery Software for Windows/Mac
Recover up to 12+ types of files, including contacts, SMS, photos, WhatsApp, Viber, notes, etc.
Restore lost data from iOS devices directly or from iTunes and iCloud backup
Recover iPhone data lost due to iOS upgrade/jailbreak, accidental deletion, device lost or broken
Support all the latest iPhone, iPad and iPod Touch
Both Free and Pro version.
If you lost data after you updated to a new iPhone, you can always use Gihosoft iPhone Data Recovery to get the data back from the old iPhone or backup.You may also like: iphonerecovery.com
If you use android phones, please choose Gihosoft Android Data Recovery.
With Gihosoft Android Data Recovery, no longer afraid of data loss!
Gihosoft RePicvid Free Photo Recovery Software provides a free photo recovery software for windows to help users recover the deleted or lost photo for free.
Jihosoft Android Data Recovery: the best Android Data Recovery software for Windows and Mac to recover deleted contacts, messages, photos, videos, WhatsApp and etc from Android devices.Tips:How to transfer messages from iPhone to iPhone

Sunday 29 July 2018

How to Use Screen Time in iOS 12 on iPhone or iPad


How to Use Screen Time in iOS 12 on iPhone or iPad
Use Screen Time in iOS 12 on iPhone or iPad


Screen Time sends your weekly report about the usage of your device as well as the set time limits regarding the apps you would like to have better control. If you have set it up as a parent, you will get reports for your child’s screen time. And then based on the insightful report, you will be able to apply restrictions for apps, content, and privacy accordingly.
How to Turn on Screen Time

By default, Screen Time is enabled, but if you had turned it off earlier, you could always get started with it.

Step #1. Launch Settings app → select the Screen Time option.


Step #2. Now, hit Turn On Screen Time.


Step #3. Next, you have two options:


Set this feature as a parent


Continue as a general user

Tap on Continue.


Use Screen Time Passcode

You can set Screen Time Passcode to prevent others from making any changes to the Screen Time settings. To do so,

Step #1. Tap on Use Screen Time Passcode.


Step #2. Enter new Passcode and Confirm.


How to Enable Downtime in iOS 12

Downtime is a very impressive feature that lets you set a schedule for time away from the screen. Once enabled, only the apps you choose and phone calls will be available to be used.

An important thing you need to know that Downtime will automatically come into action on all of your iOS 12 devices synced with the same iCloud account.

Step #1. Launch Settings app on your iOS device → Tap on the Screen Time.


Step #2. Now, tap on Downtime → Enter the Screen Time Passcode.


Step #3. Turn On the Switch next to Downtime.


Step #4. Next, Tap on Start and set the time then tap on End and set the preferred time.


While Downtime is ON, your device Home screen will get a bit dim, and the approved apps will be highlighted.

If you tap an app to open it, “Time Limit Reached” screen will appear.


You have the option to ignore the restriction by tapping Ignore Limit. Then, you will have to set a reminder in 15 minutes or set to ignore the limit for the day. Enter your Screen Time Passcode.


As soon as Downtime is finished, the screen will come back to its normal look and brighten up again. Besides, you will be able to re-access your apps.

Now, you can choose the apps you want to allow during Downtime. To do so, go back and select Always Allowed → Enter Passcode.


Then, tap on the green “+” button to the left of the app you want to allow.


If you want to disallow some apps during Downtime, tap on the red “-” button to the left of any app and then tap on Delete.


How to Set App limits in iOS 12

Don’t want your kid to overuse an app or play games too much? You can set a time limit for app categories to allow your child to use a particular category of apps only during the limited time.

Important: Another thing worth noting is that App Limits will affect all the iOS 12 devices connected to the same iCloud account.

Step #1. Open Settings app on your iOS device → Now, tap on the Screen Time.


Step #2. Next, tap on App Limits and then enter your passcode.


Step #3. Next up, tap on Add Limit.


Step #4. Up next, select the app categories. You have multiple options to choose from like games, social networking, education, Health & Fitness → Once you have selected the app categories, tap on Add at the top.


Step #5. Now, set the time limit.


Check out the option to Customize Days as well. You can choose to keep the app restriction every day or allow your kid to use apps with complete freedom on a few days. Again, you get the option to set the time limit.


Do note that App limits reset every day at midnight. You will receive notification when you near your daily limit to keep you in the loop. After the time limit is over, you will get “Time Limit Reached” screen. Then, you have the option to ignore the restriction by tapping Ignore Limit.

You will also have the option to set a reminder in 15 minutes set to ignore the limit for the day.
How to Set Time Limits for Specific App(s) in Screen Time

Are you using some apps much more than others? You can choose to add time limits for individual apps to stop yourself from going into overdrive.

The one distinct advantage of this feature is that you can keep the distractions at bay.

There are times when I start using apps like Facebook, and I forget to stop. As a result, I miss out on some the other essential things. With this feature readily available, I’m going to find out the usual suspects and then limit their usage. It’s indeed going to be very helpful.

Step #1. Open Settings app on your iOS device → Tap on Screen Time.


Step #2. Now, tap on your device name at the top.


Step #3. Under “Most Used” section, find out the app you use a lot.


Step #4. Next, tap on Add Limit and then set the time limit.


Check out the option to customize days. It lets you set the restriction on a daily basis. For instance, if you want to use an app for 1 hour each day but wish to use it for 2 hours on Sunday, you have the option to configure the limitation accordingly.
How to Enable Content & Privacy Restriction in iOS 12

You can ideally customize content and privacy restriction to block inappropriate content.

Step #1. Launch Settings app on your iOS device → Tap on Screen Time.


Step #2. Tap on Content & Privacy Resrtictions. Next, enter your Screen Time Passcode.


Step #3. Turn On the switch next to Content & Privacy.


Next up, you can make necessary changes based on your requirements. For instance, you will be able to restrict iTunes and App Store purchases, disallow particular content, apps, explicit language.


Besides, you also have the option to prevent your kid from making any changes to volume limit, Do not disturb while driving feature, etc.

There is also an option to set up Screen Time for Family. When it’s enabled, you will get weekly reports and set time limits on your child’s device.
How to Set Up Screen Time for Family

Note: Make sure to enable family sharing to use this feature.

Step #1. Open Settings app on your iOS device → Tap on Screen Time.


Step #2. Now, scroll down and tap on Family Member’s name. Now you can Set up Screen Time for the Family member.


How to Disable Screen Time Passcode

Every time you want to make changes to Screen Time options, you are asked to enter the passcode. However, if you don’t want to have it, you can disable it.

Step #1. Open Settings app → Tap on Screen Time.


Step #2. Now, tap on Disable Screen Time Passcode. Enter Screen Time passcode.


How to Clear Screen Time Usage Data

At times, you may want to wipe out all the existing Screen Time usage data to start afresh.

Step #1. Open Settings app → Tap on Screen Time.


Step #2. Now, scroll down and tap on Clear Usage Data, enter your Screen Time Passcode and confirm.


How to Turn Off/ON Screen Time in iOS 12

If you ever decide to disable Screen Time, you have the option to turn it off with ease.

Step #1. Launch Settings app → Tap on the Screen Time.


Step #2. Now, tap on Turn ff Screen Time and enter your passcode → Next, tap on Turn Off Screen Time to confirm.


If you changed your mind later, return to the Screen Time section and tap on “Turn On Screen Time.” Then, you can choose to set it up as Parent.iPhone backup extractor :The best iPhone Backup Extractor software to extract photos, text messages, contacts, voice memos, note, WhatsApp, Viber and etc from iPhone/iPad backup

Gihosoft Free iPhone Data Recovery is a professional iPhone Data Recovery software to get back all your lost text message, photo, video, call history, note, contact and more from iPhone/iPad/iPod Touch. It offers a full solution to recover your lost data in different tough situations. Besides recovering data directly from iPhone, iPad and iPod touch, it also allows you to recover data from iCloud and iTunes backup files.

Video Walkthrough of Screen Time

That’s it!

Have your say

Monday 9 July 2018

Apple releases iOS 11.4.1 (final version) 2018

WHAT’S NEW IN IOS 11.4.1 FINAL UPDATE?


iOS 11.4.1 final version (build number 15G77) comes with two minor bug fixes.


Earlier, users could not view correctly the last known location of their AirPods in Find My iPhone app. This bug will no longer pester users as Find My iPhone now displays the geographical information properly.


Secondly, this update also brings stability improvements for mail sync, contacts, and notes with Exchange Online accounts.


If all goes well with this update, Apple will likely bring the iOS 11 saga to a close and focus on its next major firmware, iOS 12.


Since this iOS 11.4.1 is a public update, you can install it on your device via OTA update. To initiate an OTA upgrade, go to Settings > General > Software Update and tap Download.


For those of you who want to perform a clean restore or want to update via iTunes, grab the IPSW firmware file below.
DOWNLOAD IOS 11.4.1 FINAL IPSW
IPHONE


iPhone 6s, iPhone 6


iPhone 6s Plus, iPhone 6 Plus


iPhone SE,iPhone 5s GSM, iPhone 5s CDMA


iPhone 8


iPhone 7


iPhone 7 plus


iPhone 8 plus


iPhone X
IPAD


iPad Air 2, iPad mini 4, iPad mini 3


iPad Pro (9.7‑inch)


iPad Air 1, iPad mini 2
IPOD


iPod touch (6th generation)
SHOULD YOU UPDATE?


Yes, you should upgrade your device to iOS 11.4.1 final in case you are affected by the AirPods location bug. For those of you who aren’t affected by this bug, staying on the latest version is always recommended due to security reasons.


As far as jailbreak users are concerned, you should constantly guard your firmware version and prevent Apple from pulling its OTA tricks on you.


Check out our Facebook and Twitter pages for more firmware downloads and updates.


Sponsor Ads:


Gihosoft Free iPhone Data Recovery is a professional iPhone Data Recovery software to get back all your lost text message, photo, video, call history, note, contact and more from iPhone/iPad/iPod Touch.

Gihosoft Android data recovery Free is a super awesome software specialized in Android file recovery. With this program, you are able to recover deleted photos, music, videos, messages, contacts, call logs, WhatsApp messages, Viber chat history and more from Samsung, Huawei, LG, HTC, Motorola, Google, Oneplus, Sony, Lenovo, ZTE and other Android devices directly. Meanwhile, this Android data recovery software is available for both Windows and Mac platforms.


4 Smart Lighting Solutions Will Make Your Life Easier [Deals Hub]

Ready to make your home a smarter and brighter place? These smart light options are ready to take your space into the 21st century and th...