iTunes library contains files that you added to your iTunes. It’s used by iTunes to organize, store, and manage music and other media files added to iTunes. Hence, iTunes library is useful to Apple users when they want to store, manage, organize and access iTunes media files and information such as playlists, play counts, song ratings.
We've discussed the following three solutions to help you export your iTunes library to a safer location. Our solutions are listed and discussed as follows:
Solution 1: Backup iTunes Library and Playlists with External Hard Drive
Solution 2: Export iTunes Library from PC to Mac Using Home Sharing
Solution 3: Export iTunes Library and Playlists to iPhone/iPad/iPod touch with iMyFone TunesMate
Solution 1: Backup iTunes Library and Playlists with External Hard Drive
Storing or backing up your iTunes library and playlists in a hard drive provides extra protection for your files. Most users who understand how unreliable iTunes can be, would make extra effort to save an extra copy of the iTunes library and playlists on an external hard drive. However, before you can transfer iTunes library and playlists from your PC to hard drive, you’ll need to locate your iTunes library.
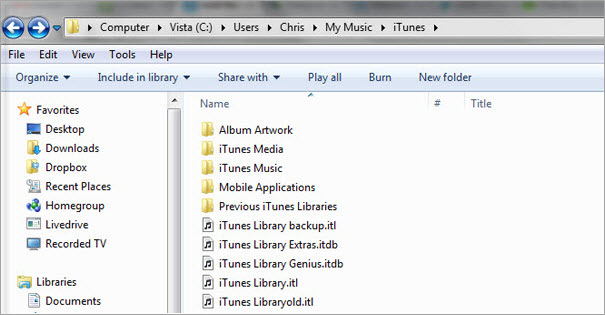
How to Locate Your iTunes Library:
Locate iTunes Media folder on your Windows computer by clicking Users > Username > My Music > iTunes.
How to Back up iTunes Library and Playlists to External Hard Drive:
Step 1Connect your hard drive to your Windows PC’s USB Port, and open the hard drive on your PC.
Step 2Locate and drag the iTunes Library and playlists folder, and drop it on the external hard drive now showing on your File Explorer.
After backing up your iTunes library on your hard drive, you can now disconnect it from your PC for safe keeping.
Solution 2: Export iTunes Library from PC to Mac Using Home Sharing
Home sharing is a good way to move your iTunes library and playlists from one computer to another. When you use Home Sharing network to download media files from iTunes Store, the files will automatically sync to all the computers on your Home Sharing network.
You can use Home Sharing to import up to 5 iTunes Libraries and Playlists from your Windows PC to your Mac computer. Here is how it works:
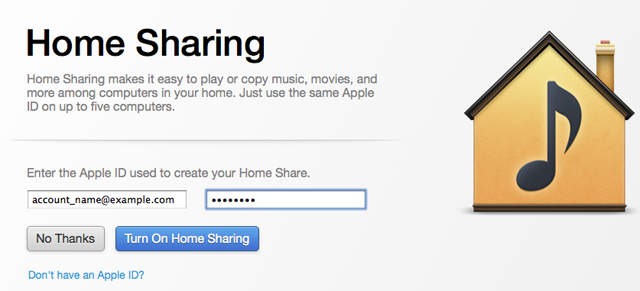
Step 1On the interface of iTunes, turn on Home Sharing by clicking File > Home Sharing > Turn on Home Sharing. Type your Apple ID and Password, then click Turn on Home Sharing.
Step 2From your Mac, choose a computer on your Home Sharing network where you want to import files from.
Step 3Choose a category (e.g. Music, Photos, etc.).
Step 4Choose "Items not in my library" from the menu appearing on your iTunes windows.

Step 5Select items you would like to import and click "Import".Sponsor ads:
Gihosoft Free iPhone Data Recovery:https://www.gihosoft.com/iphone-data-recovery-free.html
Gihosoft iPhone Data Recovery Free
Free iPhone Data Recovery Software for Windows/Mac
Recover up to 12+ types of files, including contacts, SMS, photos, WhatsApp, Viber, notes, etc.
Restore lost data from iOS devices directly or from iTunes and iCloud backup
Recover iPhone data lost due to iOS upgrade/jailbreak, accidental deletion, device lost or broken
Support all the latest iPhone, iPad and iPod Touch
Both Free and Pro version.
If you lost data after you updated to a new iPhone, you can always use Gihosoft iPhone Data Recovery to get the data back from the old iPhone or backup.You may also like: iphonerecovery.com
If you use android phones, please choose Gihosoft Android Data Recovery.
With Gihosoft Android Data Recovery, no longer afraid of data loss!
Must read:Youtube video downloader for pc
Gihosoft RePicvid Free Photo Recovery Software provides a free photo recovery software for windows to help users recover the deleted or lost photo for free.
Jihosoft Android Data Recovery: the best Android Data Recovery software for Windows and Mac to recover deleted contacts, messages, photos, videos, WhatsApp and etc from Android devices.Tips:How to transfer messages from iPhone to iPhone
jihosoft Free iPhone Data Recovery